Making A Phone Call
You do not need to dial 9 to make an outside call. You also do not need to dial 1 before a long distance number. Simply dial the 10 digit number (or 3 digit extension) you would like to reach. You can jump between the handset, speakerphone, and headset by pressing the appropriate button on your desk phone.
Receiving A Phone Call
When the phone rings, you can answer the call by picking up the handset or pressing the speaker phone button. You can also adjust the volume of the ringer by pressing the volume bar on the phone while it is ringing. If you do not wish to answer the call, you can press the REJECT softkey on your telephone and the call will stop ringing and will be diverted to voicemail
Setting Up Your Personal Voicemail
When you login for the first time, it is very important to change your password, record your name, and ideally record a personal greeting for your mailbox. Listen carefully to the system prompts as they guide you through the system.
-To login, press the MESSAGE key on your phone (often identified with an envelope icon) or call *98-Dial 3 for personal options
-Dial 2 for administrative options
-Dial 1 to change your password (follow the system prompts.)
-Dial * to return to personal options
-Dial 3 for greetings
-Dial 3 for recorded name and follow the prompts to record and save your recorded name. (This is used for the company directory. Some companies choose to record their name AND extension number so that in the future the caller can dial the extension directly instead of going through the company directory)
-Dial 2 for personal greeting
-Dial 2 to record your personal mailbox greeting (and follow the prompts to save it or re-record). Your mailbox is now ready. You can hang up the phone.
More voicemail customization options are available through the phones web GUI
Remotely checking voicemail (accessing the vociemail for a different extentsion)
Dial the phone number and extension of the number that you wish to access voicemail for.
Press * and enter the PIN for this accounts voicemail.
Forwarding Your Calls
On Grandstream phones you can enter *72 and follow the prompt to setup the number you want to forward to. To disable call forwarding dial *73 or use the softkey to cancel.
Transfering A Phone Call
Calls can be transferred to another extension on your performance cloud PBX, as well as to an external telephone number. There are two types of transfers; Blind transfers and Attended transfers.
Blind Call Transfer
Blind Transfer on Grandstream Phones
To blind transfer, WHILE ON THE CALL YOU WANT TO TRANSFER, press the TRANSFER softkey, dial the number you want to transfer to, and then press the BlindTRNF softkey. The call will clear from your phone and you can hang up.
If you have a speed dial / blf button for the person you want to transfer the call to, while on the call you want to transfer, press the TRANSFER softkey followed by the button of the person you want to transfer the call to. The call will clear from your phone and you can hang up.
Blind Transfer on Yealink Phones
To blind transfer, WHILE ON THE CALL YOU WANT TO TRANSFER, press the TRANSFER softkey, dial the number you want to transfer to, and then press TRANSFER again. The call will clear from your phone and you can hang up.
If you have a speed dial or blf button for the person you want to transfer the call to, a blind transfer is done by simply pressing that button while on the call you want to transfer. (no need to press transfer or any other keys)
Supervised or Attended Call Transfer
Attended Transfer on Grandstream Phones
While on the call you want to transfer, grab another available line on your phone and call the other party. After you have announced the caller and are ready to complete the transfer, press the TRANSFER softkey followed by the line key that the original caller is currently on. The call will clear from your phone and you can hang up. If the person does not want to take the call, simply return to the original call by pressing the line key that the original call is on.
If you have a speed dial or blf button for the person you want to transfer the call to, while on the line with the original caller press the speed dial key. The original caller will be put on hold and you will be calling the other person. Once they answer and accept to take the call, press the TRANSFER softkey followed by pressing the line key that the original caller is on. The call will clear from your phone and you can hang up. If the person does not want to take the call, simply return to the original call by pressing the line key that the original call is on.
Attended Transfer on Yealink Phones
While on the call you want to transfer, press the TRANSFER softkey and then dial the number of the person you want to transfer the call to. When the person answers you can announce the caller or say whatever needs to be said and when ready to complete the transfer press the TRANSFER softkey again. If the person does not want to take the call do not press transfer again, instead return to the original caller by pressing the line key that the call is on.
Important : By default you can?t use a speed dial or blf key for a supervised transfer, they are reserved for blind transfers or direct calling. This can be reversed on a per-extension basis upon request. (Some people ONLY do supervised transfers, while most do blind transfers)
Putting A Call On Hold
Unlike traditional phone systems where you wouldd see each individual line on every phone, when a call is put on hold in an IP system the call can only be retrieved from the phone that put the caller on hold.
While on a call, press the HOLD key on your phone (on Grandstream phones the hold key has the pause symbol on it). The call will be placed on hold on your telephone and the account key the call came in on will be blinking. You can retrieve the call by pressing the blinking button or using the RESUME softkey (depending on phone model).
Making A Conference Call
Yealink phones support 3 way conference calls, and Grandstream phones support 4 way conference calls. If you require more please look at the Conference Bridge section.
Conference Call with Grandstream Phones
Establish calls with the 2 or 3 parties you would like to have a conference call with. While one call is active, the other calls will be on hold with it?s LINE key blinking in green. Press the conference button followed by the line key that is on hold. The conference will be established. Repeat to join more people in the conference call.
Conference Call with Yealink Phones
When you want to add a third party to a phone call, while on the original call, press the CONF softkey and dial the number of the person you would like to conference in. Once the call is connected press CONF again to link everyone together.
Conference Bridge
Please see information for Setting Up Conference Bridges under the Cloud PBX Online Control Panel section below.
Using Do Not Disturb or DND
Depending on your phone model there will be a DND button or DND can be reached via the preferences on your phone. On most Grandstream models the mute button acts as the DND button as long as the phone is not on an active call.
Changing Your Phones Ringtone
Grandstream phones come with multiple ringtones and these can be changed directly on the phone by going into the menu, then preferences, and then selecting ringtones. Ringtones can also be changed through the direct phone web GUI.
Caller-ID Blocking
You can hide your caller ID when making outbound calls by dialing *67 before the number you are calling.
Intercom Call
An intercom call is paging to just one extension in particular. The phone will not ring, it will automatically pickup in hands-free mode and establish 2 way communication. It?s handy for announcing something to someone without needing the person to pick up the phone
Dialing *66 before dialing an extension number or pressing a speed dial or blf button will initiate the intercom call.
Group Paging
Most phones come pre-configured with a Paging button. Pressing the button will initiate paging to all phones. It is a one way communication between the person initiating the paging and all the phones receiving it
Group Call Pickup
If you want to answer a call that is ringing on another phone, you can simply call **. Keep in mind that if there is more than 1 ringing call you won?t know which one you?re answering.
Answering Another Extention That Is Ringing
You can answer someone elses phone call by dialing ** followed by their extension number. If you have a speed dial or blf button for that user the key should be blinking red when they have a ringing call on their phone and you can pick it up by simply pressing that button (Except the Grandstream GXP1630 as it does not have this feature).
Transfer A Call Directly to Someones Voicemail
A call can be transferred directly to a users mailbox, without making their phone ring first, by adding *4* before the extension number you want to transfer the call to. You can also simply call that number (*4* + extension number) if you want to leave someone a message and you know they are not there or available to take your call
Cloud PBX Online Control Panel
From the online portal, you can see your call logs and recordings, configure your extension on your cell phone, update your email address, configure your call forwarding / follow me calling rules, and manage your voicemail box.
Logging In To The Portal
The online portal is at http://www.activepacket.com/PBXPortal
Your login and password should be supplied by the system administrator. The first time you log in it will prompt you to change your password.
Installing the Mobyx App On Your Cellphone
With our app, you can have access to your work extension on your cell phone. You can make and receive calls as if you were at your desk in the office. You can also easily access your voicemail.
- From the Android market or App store, install the Mobyx softphone app. Or use the QR code provided.- When launching for the first time you will have the choice of putting in your account credentials or of using a QR Code. Select the QR code option.
- Log in to your online portal and scan the QR code that is on the first page when you login (You can scan your screen)
You now have your work extension on your cellphone. Push notifications are on by default, which means even if the app is not running your phone will ring when someone calls your office extension number. You can disable push notifications by pressing the more button (the 3 dots on the top right of the application screen), selecting settings, and setting Incoming Calls to only in foreground instead of Use Push Notifications.
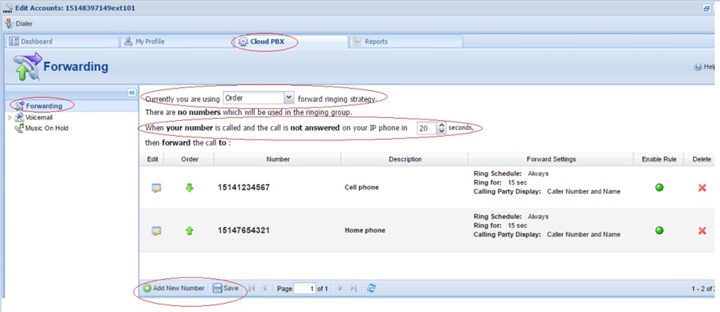
Setting Up Call Forwarding or Follow Me Calling
Forwarding can be setup in the CLOUD PBX tab, under Forwarding. From here you configure how long your extension will ring before going to voicemail, as well as setting other destinations for the call to go to (like a cellphone, home phone, another extension). The alternate destinations call all ring at the same time, or it can try the calls in the order you placed them.
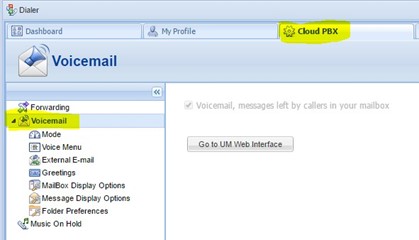
Managing Your Voicemail and Settings From The Control Panel
From the online portal you can change your voicemail password, setup voicemail notification methods, change the email address used for voicemail notifications, play and record your voicemail greetings, and much more
The above options are all configured from the CLOUD PBX tab, then by expanding the VOICEMAIL option.
Changing Your Voicemail Password PIN From The Control Panel
Your voicemail access code (and other minor options) are located in the Voice Menu portion of the voicemail options dropdown.
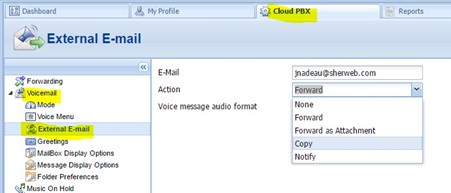
Updating Email Address Used For Voicemail Notifictions And Other Notification Settings
There are many ways of receiving and checking your voicemail messages. These options are located in the External Email section of the voicemail list.
Checking Your Messages Via Desk Phone Only (Action:None)
This is the standard option that most people have with their cell phones and home phones. When you have a message in your voicemail box, your telephone will have a message icon and the message light will turn on (depends on phone model).
- Press the MESSAGE key on your phone (often identified with an envelope icon) or call *98 Dial 1 to listen to your messages- Dial 7 to erase the message (or 77 if the message hasn?t finished playing yet)
- Follow the prompts for other options (such as hearing the date and time the message was left at)
- Hang up when done
Email And Phone Voicemail Notifications (Action:Copy)
The performance cloud PBX can also email you your voicemail messages as an MP3 file attachment. This is turned on by default. This enables you to listen to your voicemail messages and be notified of their existence anywhere you get your email. It?s important to note that the message is still in your phones mailbox and erasing it from email does not erase it from your phone. You still need to erase the messages via your desk phone or via the online portal.
Email Notifications Only (Action:Forward)
With this configuration, messages are never stored in the voicemail server or your desk phone. Whenever someone leaves you a message it will be emailed to you and then automatically erased from your mailbox
Notify Only (Action:Notify)
When someone leaves you a message, you will get an email notification that there is a new message in your voicemail box (Caller-ID included in the email subject) but the message wont be attached to the email. You need to login to your mailbox via your phone or online portal to listen to the message. This saves data (if on a cell phone) and email box storage space (if it is an issue).
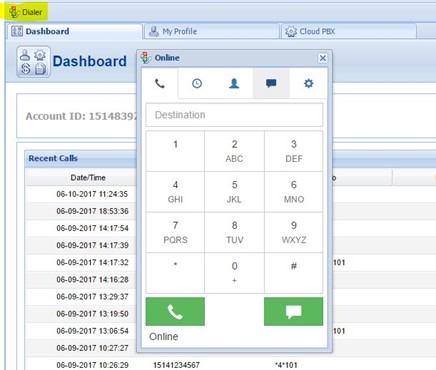
Making And Receiving Calls With A Web Browser
You can make and receive calls on your computer via the web portal. Simply click on Dialer located at the top left of the screen to make an outgoing call. Dial as you would at the office.
When someone calls your extension and you are logged in to the portal, you will get a pop-up notifying you of the incoming call. Clicking on it will open the dialer and you will have the option to answer or reject the call.
Setting Up Conference Bridges
Each user has access to create and manage their own conference bridges. These settings are configured in the Cloud PBX Tab, in the CONFERENCES section on the left.
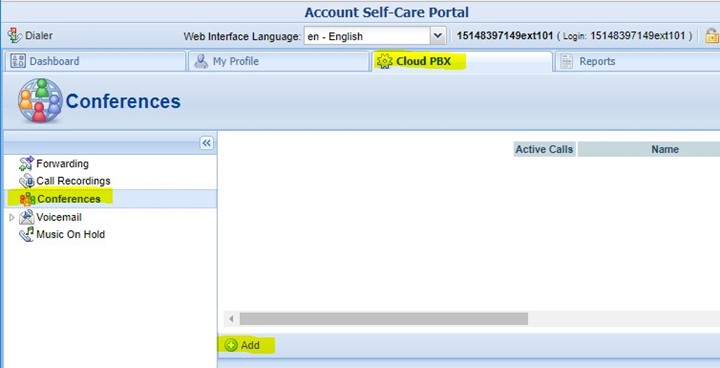
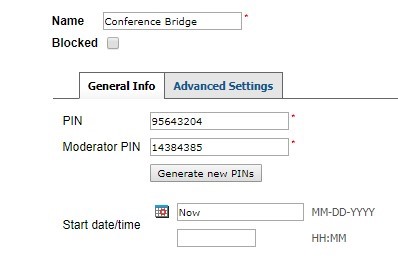
Click ADD and setup a user pin and moderator pin.
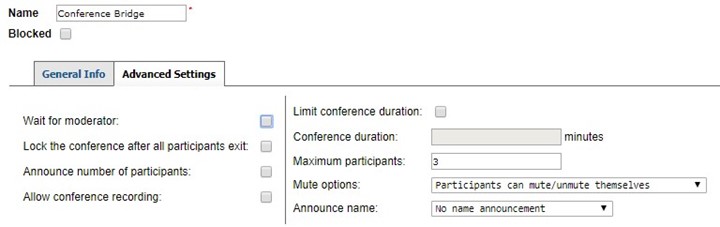
The advanced settings tab has more options for the behavior of the conference bridge.
There are a few ways of accessing a conference bridge and it depends on each particular setup. Some business have direct numbers that go to the conference bridge, so all that is required is to call that number and enter the appropriate PIN when prompted.
Direct Phone Web GUI Settings (Programming Phone Buttons And Settings)
Coming Soon